In this article I will look at a development board called the bpi:bit.
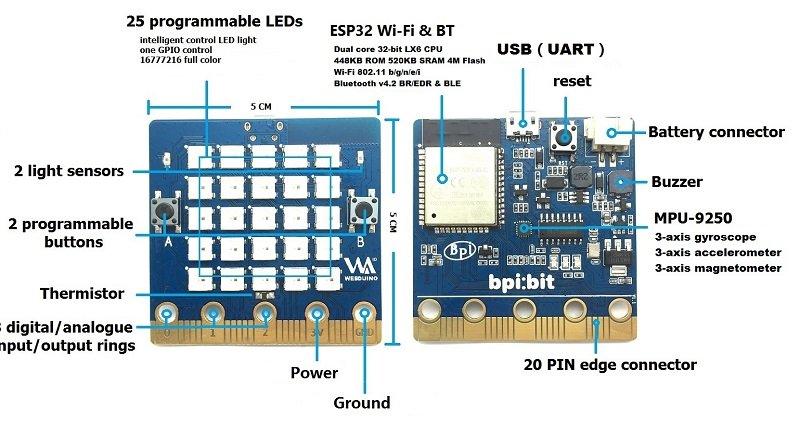
When you look at the picture below you will see that it is basically a micro:bit type development board which has an ESP32 fitted to it and a few other differences.
First of all lets look at an image of this board.

About
The board is 5 cm × 5 cm which makes it slightly bigger than a micro:bit which comes in at 5 cm × 4 cm.
As stated earlier it has an ESP32 module with Xtensa 32bit LX6 single/dual-core processor with 448KB ROM and 520 KB SRAM.
It also uses a PU-9250 which is a 9-axis MotionTracking device that combines a 3-axis gyroscope, 3-axis accelerometer, 3-axis magnetometer and a Digital Motion Processor, 2.4G WiFI, Bluetooth and USB connectivity, a display consisting of 25 RGB LEDs, two programmable buttons, and can be powered by either USB or an external battery pack. The device I/O uses the same edge connector as the micro:bit.
The board provides a wide range of onboard resources as you can see in the image above, it has two photosensitive sensors, digital triaxial sensor, digital compass, thermistor. Webduino:bit has 25 intelligent control LEDs which are controlled by just one pin .
Here is the pin mapping
| Interface | IO | Mode |
|---|---|---|
| Light Sensor(L) | GPIO 36 | Analog Input |
| Light Sensor(R) | GPIO 39 | Analog Input |
| Temperature Sensor | GPIO 34 | Analog Input |
| Buzzer | GPIO 25 | PWM(Digital Output) / Analog Output |
| RGB_LED | GPIO 4 | Digital Output |
| MPU9250_SCL | GPIO 22 | Digital Output |
| MPU9250_SDA | GPIO 21 | Digital Output |
| MPU9250_INT | GPIO 16 | Digital Input |
| R_LED(SPI_SCK) | GPIO 18 | Digital Output |
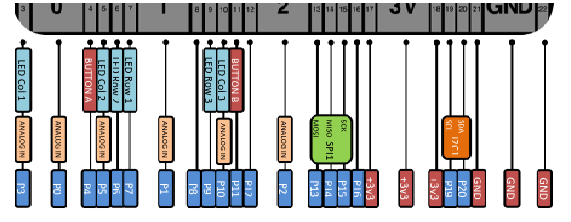
The edge connector is the same as the micro:bit, here it is

The LEDs on the board are arranged like this and are controlled by one GPIO pin – GPIO4
| ↖ | ↑ | ↑ | ↑ | ↗ |
|---|---|---|---|---|
| 20 | 15 | 10 | 5 | 0 |
| 21 | 16 | 11 | 6 | 1 |
| 22 | 17 | 12 | 7 | 2 |
| 23 | 18 | 13 | 8 | 3 |
| 24 | 19 | 14 | 9 | 4 |
| ↙ | ↓ | ↓ | ↓ | ↘ |
| P0 | P1 | P2 | 3V | GND |
Connectivity
Since it uses an ESP32 rather than a NXP KL26Z 32bit ARM Cortex which th emicro:bit uses this means as well as bluetooth connectivity you also get 802.11 b/g/n/e/i wifi connectivity.
This is potentially a huge advantage opening up the board to more IoT related development and projects.
Development
The board supports the Webduino, Arduino, MicroPython as well as the Scratch X programming environments.
The webduino is the same basic interface as the micro:bit online block editor, the editor has Chinese and English options. We will look at that in a later article with a few examples as well as the Arduino IDE as usual.
The block editor is very good for beginners and also for STEM, hopefully this will introduce the ESP32 to even more people.
Micro:bit compatibility
Since this has the same edge connector this means that there are several excellent add on boards that can be easily fitted and used, I’ll be introducing and testing these on this site in future articles.
The pin functions are the same as the micro:bit as well
Cost
This board will cost you $21.50 – Banana PI Bit board with EPS32 for STEAM education
At this price its a very good board at a good price, if you have Micro:bit add-ons then that’s an added bonus
Links
arduino Source code on Github: https://github.com/BPI-STEAM
webduino source code on github: https://github.com/webduinoio
https://github.com/BPI-STEAM/BPI-BIT-Hardware
